Hi there! This post will take you on a quick, easy, guided tour to show you how to set up a Bluehost web hosting account and install a WordPress website in your account in about 10 minutes.
If you’re arriving here from somewhere other than our in-depth review of Bluehost, you should have a read of it right over here and find out why they’re our #1 choice for best web hosting service for small businesses.
Alright, let’s get to it…
How to install a new WordPress website on Blue Host in about 10 minutes.
Okay. Set a timer. Here we go. A new WordPress powered, Blue Host hosted website for the home base for your online business, and which you have full control over, can appear on the interwebs in about 10 minutes.
Here’s how to do it. Ready? Set…GO.
Step 1
Click here to sign up for a Blue Host account. Leave that other tab open with Bluehost and I’ll guide you through the sign up process.
Step 2
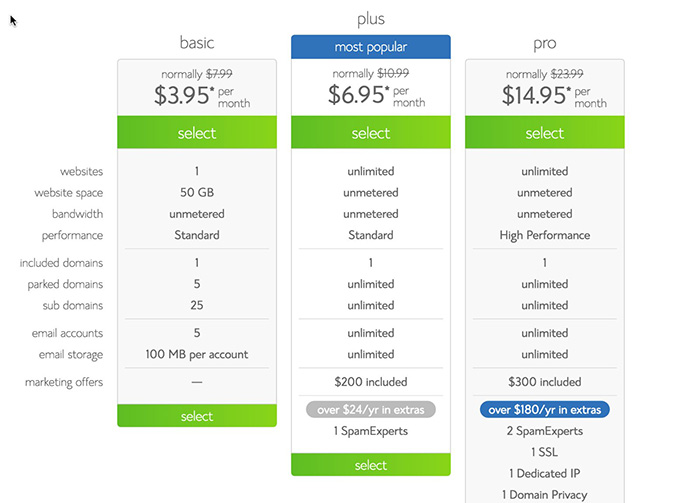
Click on the Get Started button at the top of the page and on the next page, choose which hosting plan you want. Either the Basic or Plus plans will work great if you have a new business and a brand new site that you need to build. (You can upgrade to other plans down the road if you need better performance for your site or other features that come with the more expensive plans.) If it were me and I had a new business and site I needed to build, I’d go with the plus plan because storage and bandwidth are unlimited on that plan.
Step 3
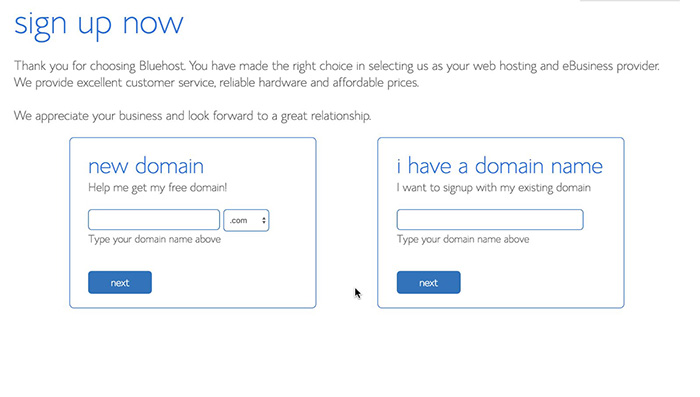
On the next page, if you need to register a new domain name, you can do so in the left box, which means you’ll register your domain name with Blue Host, which makes things easier because you don’t need to buy a domain name at another domain name registrar. It’s also free with your account, which is good.
If you already have a registered domain name with another domain name registrar, enter the domain name you want to use for your Blue Host account in the right box.
Step 4
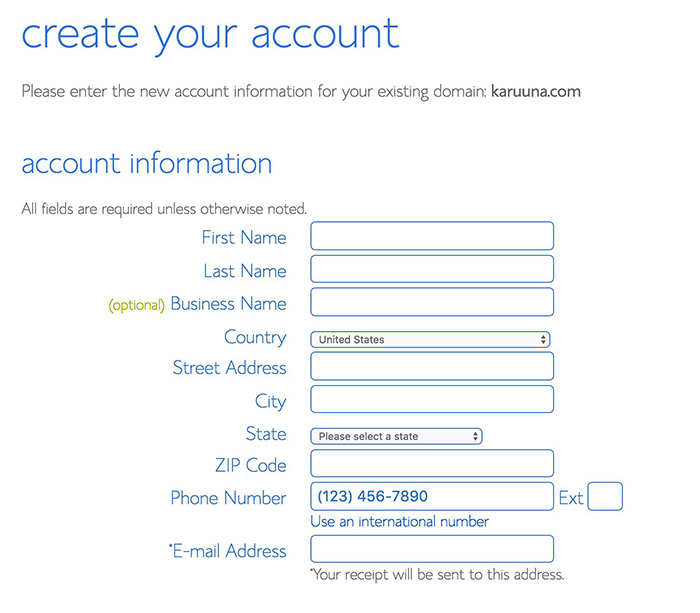
On the next page, you’ll enter in your personal account information. If you see a pop-up offer for a domain security and site backup option, it’s a good idea to go ahead and sign up for that offer, because both of those are good to have.
Step 5
Lower down on this page, look at the “Package Information” section. By default, the three-year package will be selected, which means you’ll be paying for three years of hosting all at once, in one payment. It’s fine if you want to do that. You’ll get a bigger discount, but, you can also just select to pay for one or two year’s worth of hosting right here, so select which package you want.
Also, it’s good to have the Site Backup Pro option checked, and the Sitelock Security option as well. They cost a little more, but they’re important (meaning, they could save your ass one day.)

Step 6
Enter your payment info at the bottom of this page, and when you’re done, click the Submit button at the bottom of the page.
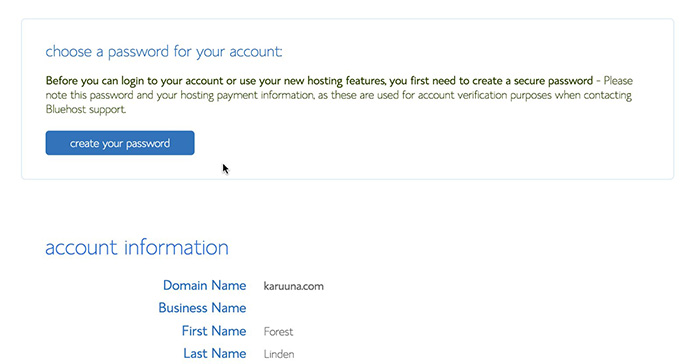
Step 7
On the next page, you’ll need to create a password for your account, so click on the Create Password button.
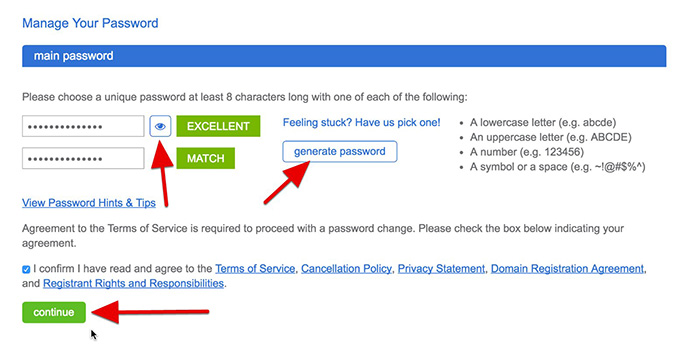
Step 8
You’ll want a super strong, secure password, so unless you have a password manager that creates crazy strong passwords automatically, go ahead and click on the “Generate Password” button and let Blue Host generate a strong password for you. (Pro tip: DO NOT use the password “pa$$w0rd”. Seriously. That’s easy to remember, and you may think it’s smart, but it’s insanely easy to hack. I make my passwords at least 18 characters long, with a mix of upper and lower case letters, numbers, and symbols.)
Then, click on the little eye icon so you can see the password it created, highlight it, copy it to your clipboard, and paste it somewhere safe, such as in a password manager like 1 Password. [ affiliate link ] (You are using a password manager, right? If not…I HIGHLY recommend using one. Your life on the web will be better by a factor of four. It will store all of your passwords for every site, and allow you to login to any site where you need to login with just one click. You never, ever have to memorize a password again, which means you can make mind-bogglingly long, super strong passwords that would be a major pain in the ass to remember, like this: P,e/$^aj4LY8A6?oMeZB22KjTzWA.)
Then click on the “I’ve read the terms of service” button at the bottom and click on Continue.
Step 9
On the next page, you’ll see a login form for you to login to your account. At this point, you’ll also get an email with your account information and a payment receipt. Go ahead and log in with the domain name or username and the password you created in the previous step.
Step 10
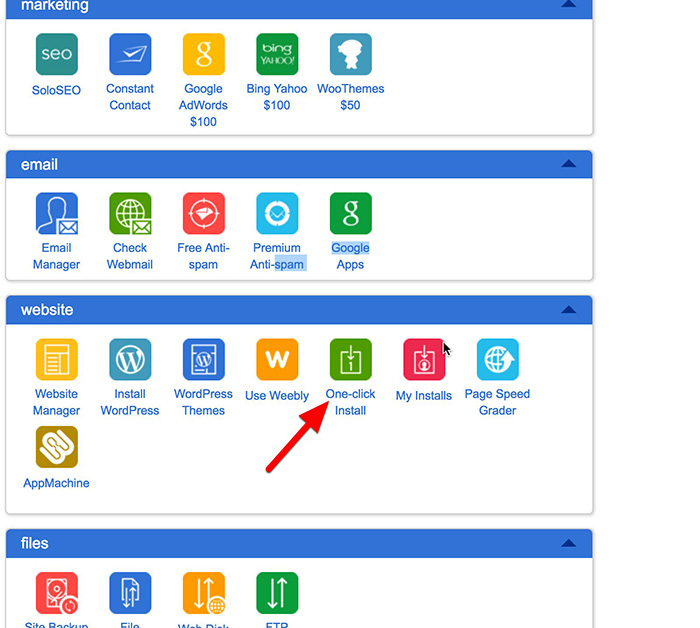
Once you login, you’ll be on the dashboard of your Blue Host account. It’s a dashboard for a whole ton of things you can do with your account. You’ll come here every so often to do various things related to your website, like adding new email accounts.
For now, you’ll use it to install a fresh copy of WordPress.
Scroll down the page, and in the Website section, click on One-Click Install. If you see a pop urging you to take a “get started” tour, you can just close that pop-up.
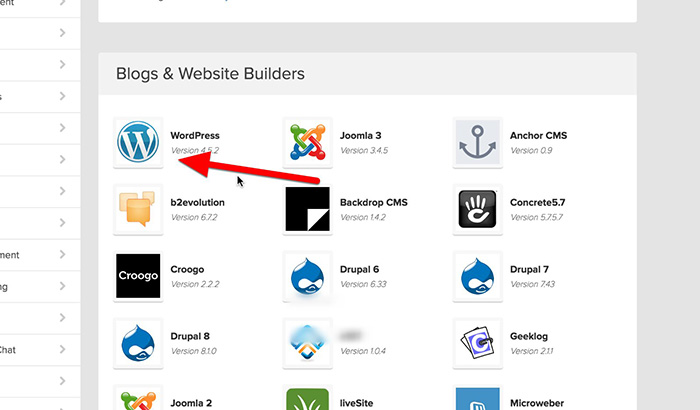
Step 11
On the next page, in the Blogs and Website Builders section, click on the WordPress icon.
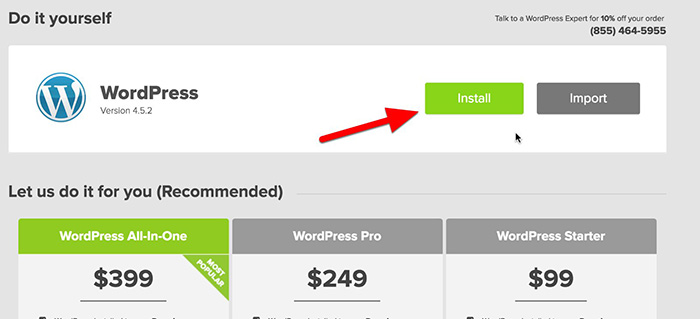
Step 12
Then, on the next page, click on Install.
Step 13
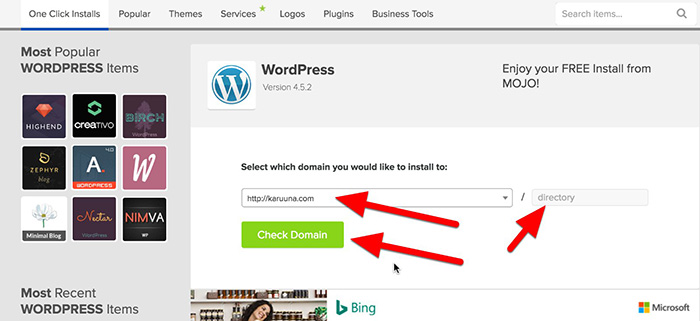
Next, you’ll be asked which domain you would like to install to. The domain you used when you set up the account should be selected here. You can leave the “Directory” field blank, which will install WordPress in the root, or top-level, directory.
Then click on Check Domain. The process that happens next can take a few minutes, so go check Facebook while it’s doing that.
Step 14
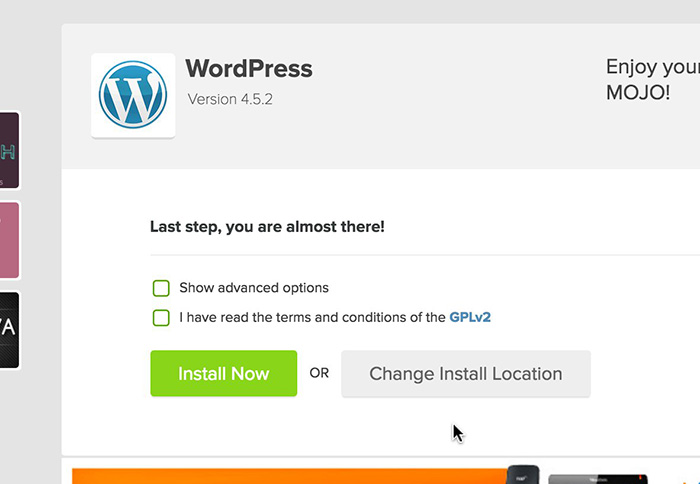
After the check is done, you’ll see this appear. Click on the “show advanced options” checkbox.
Step 15
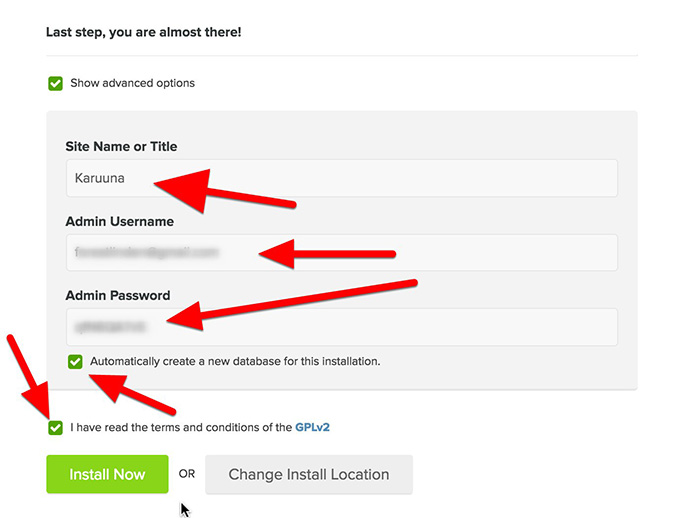
Fill in your site name in the Site Name field. Then, copy the username and password listed and store it somewhere safe, like the 1 Password app I just mentioned above.
This will be the login info you’ll need to login to the admin side of your WordPress site.
Make sure that “automatically create new database” is checked, and also check the “I have read the terms and conditions” box (and if you need some help falling asleep, go ahead and read the terms and conditions), then click on the Install Now button.
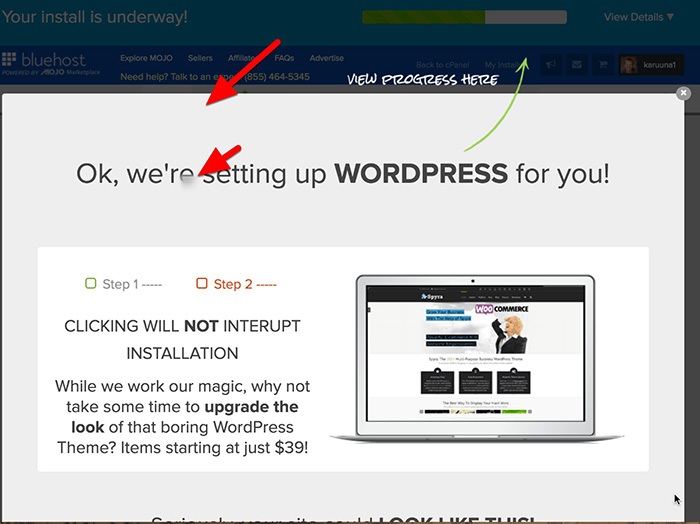
Step 16
After you do that, wait for a bit, and you’ll see this pop-up letting you know that things are being set up for you. You’ll see a progress bar at the top of the page letting you know the status of the installation process.
The pop up will have an ad for purchasing a premium WordPress theme. You can check that out now, or wait until later for that. The theme is what will style the front of your site. It’s the design that people will see when they come to your website. You’re going to need a theme, even if you heavily customize it to your liking, but you don’t have to shop for one at this phase.
Feel free to close that pop-up.
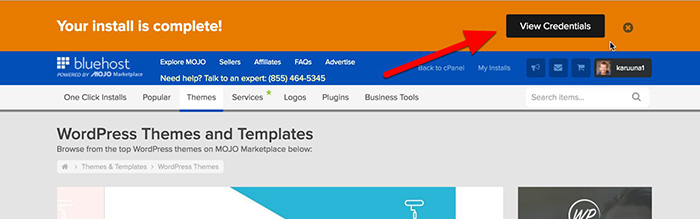
Step 17
After you close that pop-up, and after the installation process is done, click on View Credentials.
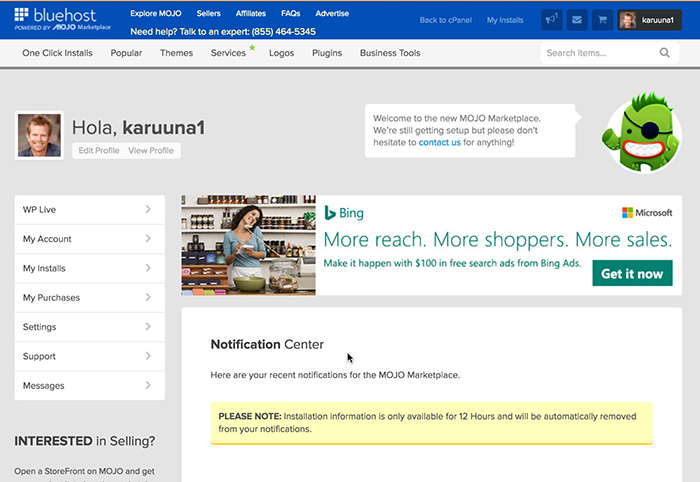
Step 18
At this point, you are now logged in to the Mojo Marketplace, which, despite having a horrible name, is where you’ll go to manage a few things about your WordPress installation. You can also buy premium WordPress themes from within this marketplace, but there are many other places to buy themes as well, like Elegant Themes or Themeforest, two of my top picks for premium themes.
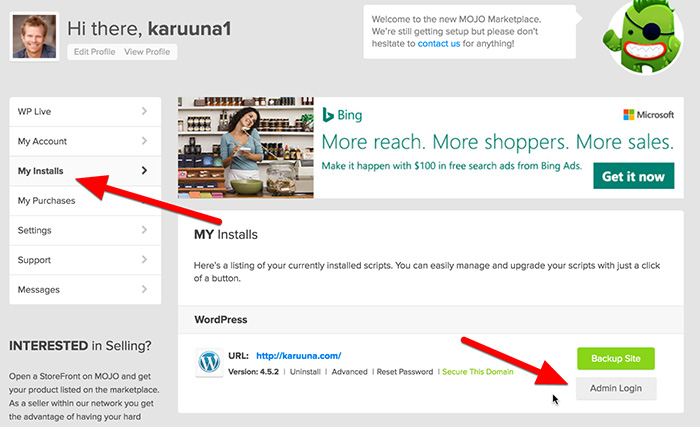
Step 19
Next, click on My Installs in the left column menu, and then click on Admin Login. This will bring you to the main login page for the admin side of your new WordPress site.
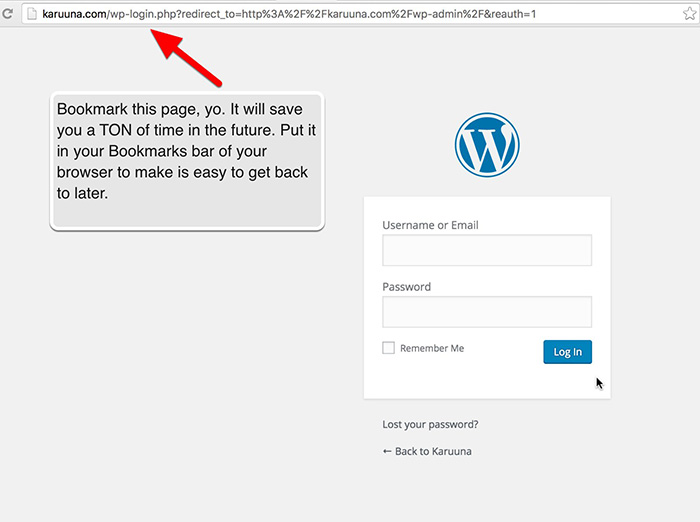
Step 20
Bookmark this page in your browser before you login. It’ll save you several steps in the future when you need to login to the admin side of your site, which, in the beginning while you’re building your site, will be every day that you work on it until it’s ready to launch.
Then, enter your username (which will be your email address) and password that you copied in Step 15 above.
Step 21
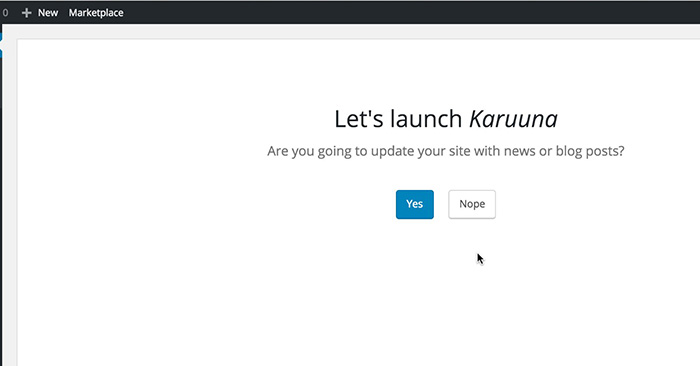
Once you’re logged in, you’ll see a screen asking you if you want help setting up a Business or Personal website. This is a guided “wizard” type tour that will take you through some basic setup steps. If you’re new to WordPress, it will probably be easier for you if you go ahead and do the guided steps.
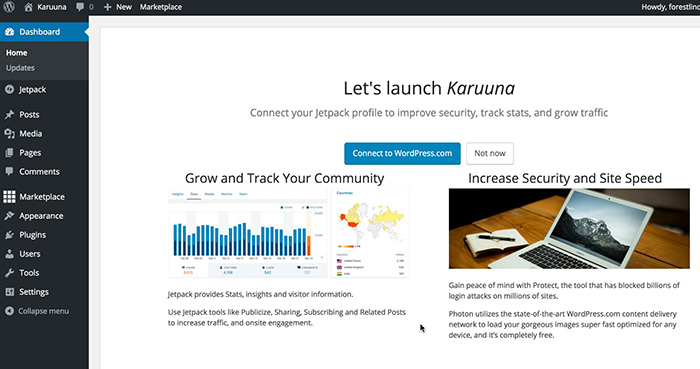
I clicked on Business on that page, which brings me to this page:

Step 22
Keep going through the guided questions and answer them appropriately, unless it asks you what your favorite food is. That’s not appropriate for software to ask you.
Step 23
When you get to the page asking you if you want to set up Jet Pack (which is a useful WordPress plugin that does things like give you user traffic stats, and protect your site with anti-hacker firewalls) you can go ahead and do this now, or do it later. If you do it now, you’ll need to create a WordPress.com account and connect it to Jet Pack.
Step 24
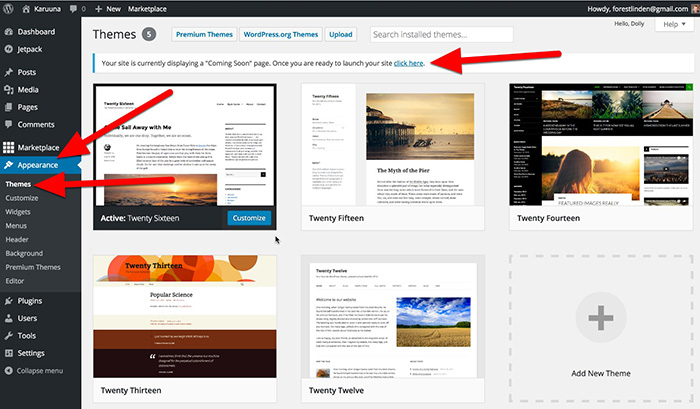
At this point, you’re ready to install a theme for your site. There are a handful of free WordPress themes that are already installed and ready to activate, but you probably won’t be super thrilled about their design. You can see them by clicking on Appearance, then Themes.
By default, the 2016 theme will be the active theme.
Make sure to notice the message at the top of this page, which says that your site is currently displaying the Coming Soon page, and to click on the link in that message when you’re ready to take the site live.
You can leave things set the way they are, with that message appearing while you build the site. You’ll be able to see what you’re building, but everyone else who might happen to find your site will see a Coming Soon message.
When you’re ready for your site to go live, just click on the link in that message. That’ll be one step needed to take your site live.
Step 25
You can now go shopping for a good, premium theme in the Mojo Marketplace, which you can access from within your WordPress admin panel by clicking on the Marketplace menu item in the left column menu, or at another theme provider like Elegant Themes or Theme Forest.
I’ve purchased a popular, incredibly powerful and flexible theme from Elegant Themes, called Divi. It’s a multipurpose theme that you can easily customize into millions of different variations, literally, allowing you to create a unique site that won’t look like anyone else’s site who has Divi, all without ever touching a line of code.
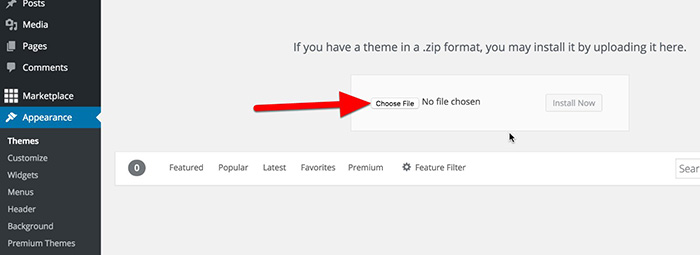
To install the Divi theme, since I’m still on the Themes page, I’ll just click on the Upload button at the top.

Step 26
Then, as you’re following along, click on the Choose File button and locate the .zip file of the theme that you purchased and downloaded. Mine is called “divi.zip.”
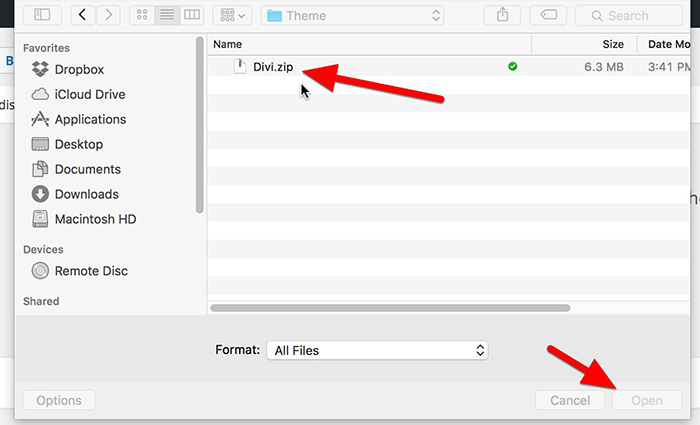
Step 27
Once you find the file, select it, and click on Open in the lower right of the pop-up window to select that file.
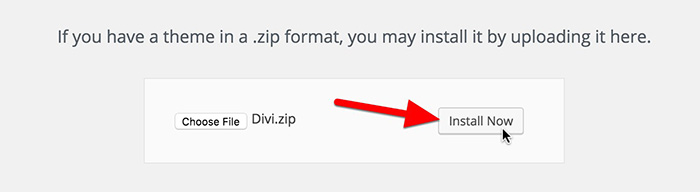
Step 28
Next, click on Install Now (which I think should say “Install Now, Yo,” because user interfaces in software are always so serious.)
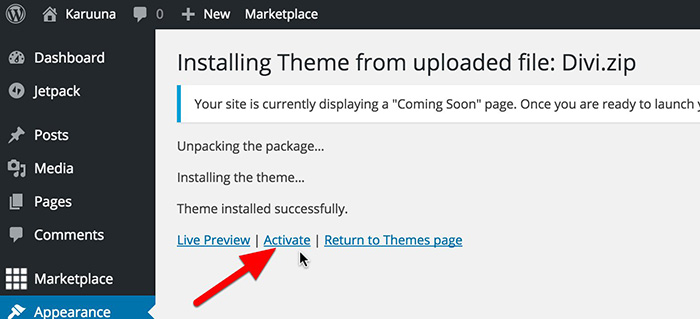
Step 29
After the page refreshes, you’ll see the success message. Next, you’ll need to click on the “Activate” link at the bottom of the message to make your theme the active theme on the site.
Step 30
Okay, at this point, you are in brilliant shape. You’ve got a home for your website (your Blue Host web hosting account). You’ve got a fresh copy of WordPress installed (yay!). And now you’ve got a theme installed (which is like the clothes your site wears out in public.)
There’s a good bit more work to do beyond this to build a site, but a great place to check for more instructions on what to do next is in the documentation for your theme. Divi, in particular, comes with a TON of instructions and guided videos on how to build a site with it. There’s also a great WordPress course inside Lynda.com’s massive software tutorial library.
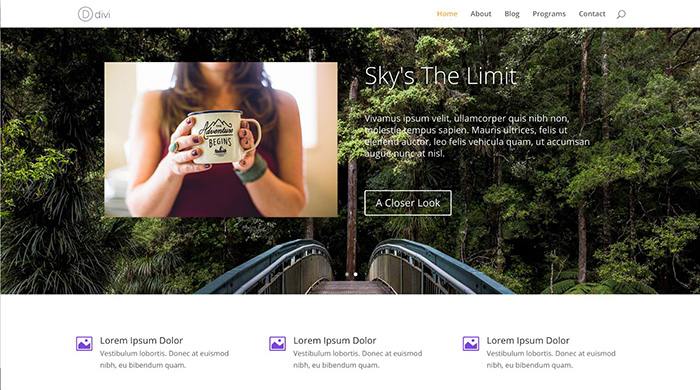
For now, I’ve used some of the pre-designed layouts of Divi, which come with demo content, and in a few minutes time, have set up my demo site so that it now looks like the below screenshot. I spent less than 5 minutes loading the pre-designed layouts for a handful of pages, and then added a couple of my photos to the slider at the top of the page.
The total amount of work time to get to this point: 10 minutes 32 seconds.
Okay, see? That wasn’t so hard. Setting up a Bluehost account and installing a WordPress website is easy peezy lemon squeezy.
Seriously, you don’t need to spend $7,000 to hire a web designer to build a site for your business. You can totally DIY this puppy.
Just head over to Blue Host to set up a new account, and then I’d highly recommend heading over to Elegant Themes and signing up for a subscription there. For $69, you’ll get access to their entire theme library, which is great for people like us who can’t ever decide on what theme to use, especially when there are 50 choices.
Go kick some website building ass!!
All the best to you,
~Forest